Parent Experience in Clevr

It is recommended that school office staff are trained and comfortable using Clevr; therefore able to assist parents requiring assistance
The Clevr Parent Experience provides parents and guardians with secure access to student information and parent-facing forms. After receiving a welcome email, parents can securely log in to review and complete forms that have been shared with them by the district.
What Parents Will See
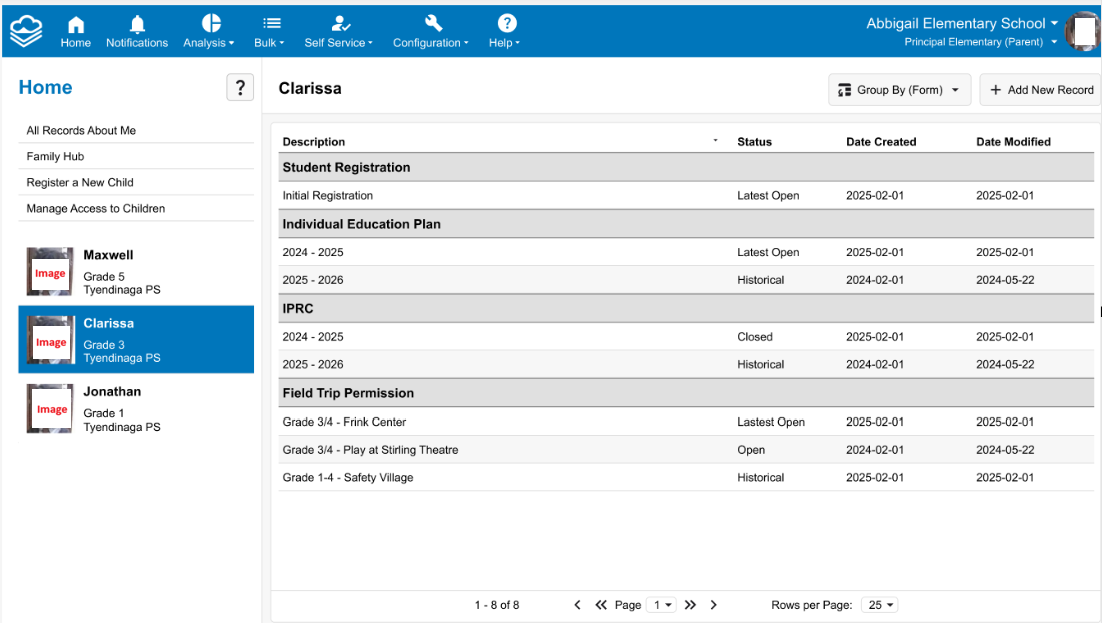
After signing in, parents will see each of their children listed in the left-hand navigation. Selecting a child displays all parent-facing forms that are available for that student. Depending on the district's configuration, this may include registrations and other student forms.
Configuration Steps (Clevr team and / or District)
- Upload parent/student relationship data so parent accounts can be created and linked to the appropriate student(s).
- Configure the Parent security role in Clevr.
- Configure parent access for each form by:
- Applying detailed permissions (No Access, Read Only, or Read & Write) to specific sections of each form. For example, parents may have Read Only access to an IPP while retaining Read & Write access to the signature section
- Adding digital signature fields where required (optional)
• Updating printouts to include digital signatures where required
• Configure notifications and settings.
• Test and validate each signature area before deployment. - Send welcome emails to parents with their login credentials and access instructions.
Related Articles
Parent Logins - Set initial password
Parents will be prompted to set a password the first time they log in to Clevr. After setting their password, they can access Clevr using their username and password on the login screen. This article applies to new parent accounts imported from ...Clevr Help Guide: Using the Record History Audit Log
Overview The Record History Audit Log is a powerful tool within the Record History module of Clevr. It enables users to track all edits made to a record, making it especially useful for troubleshooting saving issues. How to Access 1. Navigate to ...Sign Out of Clevr
Sign out To log out of your Clevr session, click on the icon at the top right of the screen and select "Sign out." This will end your current session.How Records Become Locked in Clevr
A "locked" record is when a record has a read only status applied to it preventing edits from being made. Records in Clevr can become locked through a number of processes listed below: Record Rollover - A record can be locked via the Record Rollover ...Instructions: Preparing and Uploading an Electronic Signature on Clevr
Your signature will appear on printouts of finalized records only when the forms and reports have been properly configured to include it. Step 1: Create a Digital Version of Your Signature Sign a blank piece of white paper using a blue or black pen. ...