How to Perform a Record Rollover
This article is a detailed guide on how to perform your record rollovers using the Record Rollover Wizard in Clevr. A Record Rollover is a process used within Clevr to archive records. It is typically performed once a year, usually during the summer after data entry within the current school year’s records is complete.
 To access this feature, the Record Rollover Wizard page right is required. A role will also need the Form Manager to flag forms with the rollover style.
 Before performing your rollovers, please refer to our 4 step guide, and preparing your forms for record rollovers.
Record Rollover Wizard Training Video
Step 1: Launch the Record Rollover Wizard
To access the Record Rollover Wizard, go to the Configuration menu in the clevr Navigation Menu and select Record Rollover Wizard.
This
will bring you to the Record Rollover Wizard and will provide details
including what a rollover is, what forms require a rollover and why it
is important to include this in your yearly maintenance schedule.
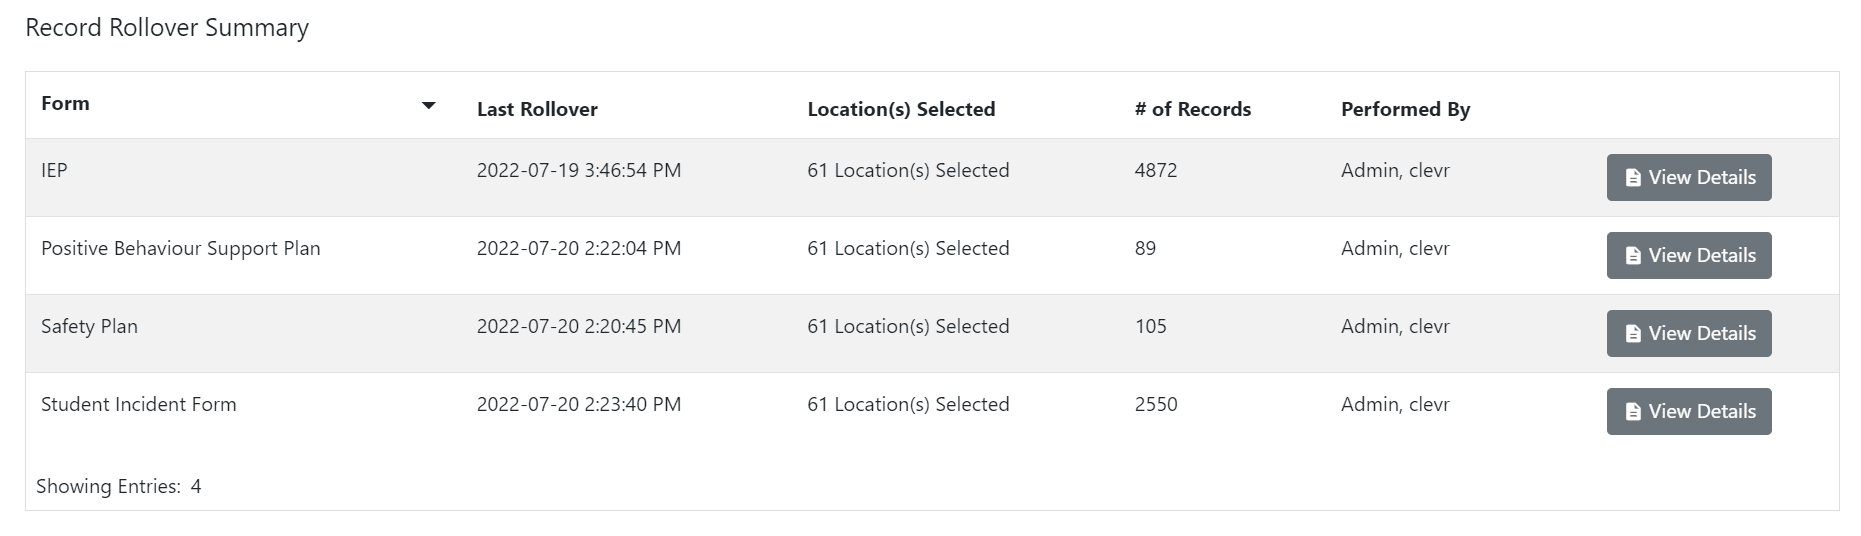
At the bottom of the Record Rollover Wizard you will see a summary of your past Record Rollovers, including:
- Form Name – The form that was archived during the rollover
- Last Rollover – The date the rollover occurred
- Location(s) Selected – The locations included in the record rollover
- # of Records – The total number of records processed by the record rollover
- Performed by – The Clevr user that performed the rollover
- View Details – Clicking this button will open a pop up window where you can see:
- The list of locations where the rollover was performed
- The record description selected
- Which fields were bulk updated with the rollover
- A list of all records that were impacted
- The ability to undo a rollover
Step 2: Selecting Locations
Within the
Location window, you will be prompted to select a location or locations
that are to be included in the Rollover. Locations are used to
determine the records that are to be included in the Record Rollover process.
If
the Rollover Wizard detects that your user account is missing one or
more location(s), it will deliver messaging to warn you that the
locations you do not have access to will be skipped. If you get this
message and are supposed to have access to all locations, before you perform your rollover you should update your user account to include all locations.

To select the locations that should be included in the rollover, click on the checkboxes that are beside each location. Once selected, click the Next button.

Step 3: Selecting a Form and Rollover Type
Selecting Your Form
In
the Form window, you will be prompted to select a form for archiving.
The forms that are listed here will be based on the location that was
chosen on the previous screen
Click on the dropdown menu to select the form that you wish to Rollover.

After
making a selection, a clock icon will appear to the right of the form
name. Clicking on the clock icon will display the Record Rollover
History for the form outlining:
- The name of the form
- The date and time a rollover was processed for the form
- The user that completed the rollover
- The number of records that were affected during the rollover process

Selecting a Rollover Type
After
you have selected the form from the Form dropdown menu, you will be
prompted to select the type of rollover you want to complete.
The Rollover type will allow you to
specify what happens to the records during the rollover process. Here we
have 3 options to choose from:
- Lock Existing Record – Choose this option to lock existing records. This option will lock all records without preparing a blank new record for next year. New records will be created manually.
- Create New Record – Choose this option only if you’d like to make a blank new record for next year in addition to locking the previous records. If you would like a cloned record instead of a blank one, ensure you select the next option.
- Copy Data Into New Record – Select this option if you’d like to copy the data from this year’s record into the record you are creating for next year in addition to locking the previous records. Selecting only “create new record” without this option will make the new record blank. Data within all fields with the exception of those flagged as donotclone will be available within the cloned record. By default all fields will clone, so if you do not want this data present within next year’s record you need to make sure they are flagged with the donotclone attribute.
For more information about the 3 Record Rollover Types, please refer to our article: Record Rollover - Understanding the Three Rollover Types
After you have selected the form for archiving and the type of rollover, lick Next.
Step 4: Rollover Options by Rollover Type
Rollover Type = Lock Existing Record
If you would like all persons to be removed from the Listings Card to start fresh for the new year, you can select the Archive Person From Listing Card option. This feature removes the person from the Dashboard Listings Card so that they are no longer visible when viewing your records. By default, if the Archive Person from Listings Card option is not selected, records will appear in the Listings Card with a Locked status.
If you choose to archive persons from the Listings, you will be required to manually add them back if they require a record and this action can not be undone.

Rollover Type = Create a New Record
When creating a new record, Clevr will prompt you for a name of the new record. This name should indicate that it is for the upcoming school year.

Next, we can choose to exclude students in specific grades if applicable. If you select this option, the grades excluded will have this year’s records bulk locked without a new or cloned record created.

Depending on how your form is customized, you may be prompted to populate information into specific field(s). The fields available for updating will be listed under the header titled The following fields have been flagged to accept new values when a record is created.

The fields that are displayed here have been flagged on the form so that they are updated during the Rollover season. The fields listed can be updated with the data that you wish to see on the newly created record.
Rollover Type = Copy Data into a New Record
When choosing to copy data into a new record, all form fields will copy into the new records by default, so if you do not want data within specific fields to present within next year’s record you need to make sure they are flagged with the "Do Not Clone" option. The "Do Not Clone" option is great for fields where the data will not apply next year. Some examples of fields that need Do Not Clones include Subjects tabs on an IEP, Signature sections and Notifications

Fields that you wish to remain blank in the new records when using the Copy Data into a New Record option need to be flagged as "Do Not Clone" within the form settings.
When copying data into a new record, Clevr will prompt you for a name of the new record. This name should indicate that it is for the upcoming school year.
Next, we can choose to exclude students in specific grades. This option will lock the previous year’s record for the grade that has been identified and prevent a new record from being created.

Depending on how your form is customized, you may be prompted to populate information into specific field(s). The fields available for updating will be listed under the header titled The following fields have been flagged to accept new values when a record is created.

The fields that are displayed here have been flagged on the form so that they are updated during the Rollover season. The fields listed can be updated with the data that you wish to see on the newly created record.
You may have fields on your form that have been flagged for exclusion on the cloned record. These fields will be listed under the header titled: The Following fields have been flagged to be excluded from the record rollover process (donotclone). The data that is in the fields for the current year’s record will not be copied over to the cloned record. This will result in a “blank” field on the newly cloned record.

Step 5: Confirming Rollover Details
The
Summary Screen that displays on the Record Rollover Wizard will provide
details about the rollover prior to processing the request. It is
suggested that the information displayed here is reviewed thoroughly to
ensure the form that was selected is rolled over correctly.
On the Summary Screen you will be
able to identify the form that is being archived, the location(s) that
are affected, rollover type, record description name, the fields that
will be updated and fields that will be excluded.

After you have reviewed the summary screen and are satisfied with what has been configured, click the Begin Record Rollover button.
Note: If changes need to be made to the options that were originally
selected, click the Previous button in the bottom right hand corner to
go back and make your desired changes.
Step 6: Processing the Rollover
Immediately after selecting the Begin Record Rollover button on the Summary Screen, Clevr will begin archiving the records
for the form that was selected. Whether you have selected one location
or multiple location, the Rollover Wizard will display its progress,
first preparing the records for rollover and then archiving the records.

The Record Rollover Wizard will confirm that the rollover was completed as well as the records that were affected.

After clicking the OK button in this window, you will return to the Record Rollover Wizard
Introductory screen which will display a summary of the rollover under
the Record Rollover Summary.
Related Articles
Your Clevr Record Rollover - 4 Step Process to Ensure Success
The record rollover in Clevr prepares your records for the following school year. Please follow the 4 step process outlined in this article to ensure school start-up success. Step 1: Watch Record Rollover Training Video Clevr's Rollover Wizard ...Record Rollovers - Understanding the Three Rollover Types
Lock Existing Record Locking the existing record locks the past records while making it accessible within the Record History. This is a great option for forms about a specific or one time event where the person is not guaranteed to need a record for ...How to Undo a Record Rollover
A record rollover can be undone within the Record Rollover Summary page. Navigate to the form that you’d like to undo the Record Rollover for and select View Details: Within the Rollover Details page, select the rollover you’d like to undo in the ...Clevr Rollover Timing Guide
The timing of your record rollover is a key indicator of success in preparing your records for the new school year. Please refer to the 3 options below to ensure your records are prepared as expected for the new school year. Click above image to ...How to View Details for Past Rollovers
On the first page of the Record Rollover Wizard at the bottom you will find the Record Rollover Summary that lists the details of your past Record Rollovers including: Form Name – The form that was archived during the rollover Last Rollover – The ...