Enabling Pop Ups within your Browser
Printing and many other features within clevr are dependent on pop ups being enabled within your internet browser. This document will cover how to enable pop ups for Chrome, Firefox, Internet Explorer, and Safari.

Determining Which Internet Browser You are Using
Determining which internet browser you are using is important as the instructions for each will vary. You can determine which browser it is based on the icon. The icon is what you click on to launch your internet browser.

Google Chrome
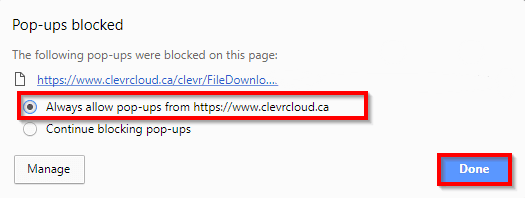
When a pop up has been blocked within Google Chrome, an icon will appear within your browser’s address bar. Click on this icon.
Within the window that opens, select “Always allow pop-ups from https://www.clevrcloud.ca” and press Done.

This will enable pop ups for clevr going forward. You will need to click print again to generate the printout; enabling pop ups for clevr does not retroactively generate printouts.
Mozilla Firefox
When a pop up has been blocked within Mozilla Firefox, a yellow Information Bar will be displayed at the top of the screen, and this icon will appear within your browser’s address bar. Click on the Options button shown below.

Within this menu, select “Allow pop-ups for www.clevrcloud.ca”. This will allow the printout to generate.

Microsoft Internet Explorer
When a pop up has been blocked within Microsoft Internet Explorer, an Information Bar will be displayed at the bottom of the screen. Click on the Options for this site button shown below.

Within this menu, select “Always allow”. This will enable pop ups for clevr going forward. You will need to click print again to generate the printout; enabling pop ups for clevr does not retroactively generate printouts.

Apple Safari
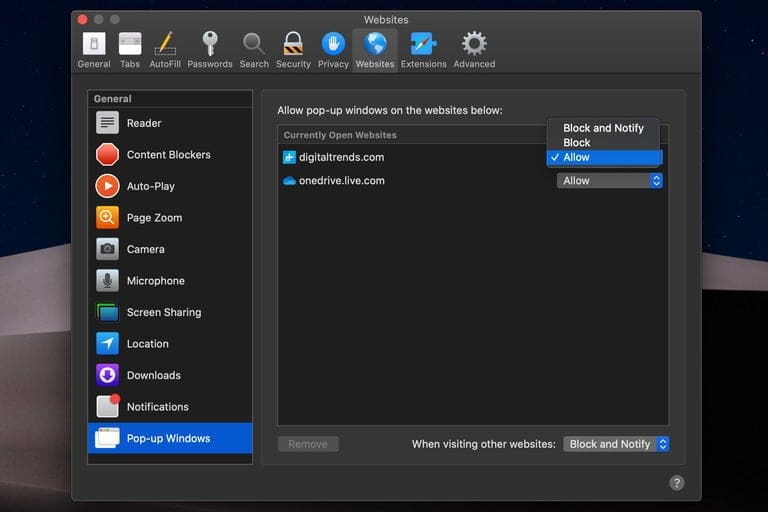
Open Safari and click on “Safari” located in the top left corner followed by Preferences in the resulting drop-down menu. In the pop-up window, click the Websites tab
In a pop-up window, click the Websites tab option along the top, then choose the Pop-up Windows menu option on the left.

Related Articles
How to Print the List within your Dashboard
To print your dashboard listing, navigate to Full Screen mode within the Listings card, then use the Web browser print option When finished, use the "x" in the top right corner to close full screen mode and return to your DashboardPrinting a Single Report for a Person
To generate a single printout for a person, within their record navigate to the Print menu. Some forms have multiple printouts available to generate. Select the appropriate printout by clicking on it. When you click Print, a new tab will be generated ...Starting a New Form From Within a Record
You are able to start a brand new form for a student while you are within an existing record without the need to go back to the Dashboard. While you are within a record, locate the dropdown shown below on the right hand side of the page. Clicking on ...Dashboard - My Forms - How to Create Record
This article will walk you though how you can create records from the My Forms card on the Dashboard. In the top right corner of the My Forms Card, hit the Add button: Within the pop up, select your location and which form you'd like to create your ...How to Lock or Unlock a Record in Record History
The Edit Record History page right is required to use this feature. Locked Record - A record that has a read only status applied to the entirety of the record; no edits are possible while the record is locked. Active Record - A record that is ...