Threshold Notifications
Introduction to Threshold Notifications
Threshold Notifications are a powerful feature within Clevr that allow you to set specific triggers based on the data input in your forms. When thresholds are met, custom notifications are sent to the recipients you designate. This feature can help you track key metrics and stay on top of important trends in your data.
This guide walks you through the setup and configuration process, so you can start benefiting from Threshold Notifications right away.

Setting Up Threshold Notifications
Step 1: Access the Form Manager
To begin, log into Clevr and navigate to the Form Manager. Select the form where you’d like to enable Threshold Notifications. Below the existing Notification card, you’ll see a new card labeled Event Thresholds.
Step 2: Configure Threshold Fields

The next step is to determine which fields in your form will be used to trigger the notifications. To do this:
- Click the Add button in the Threshold Fields row.
- A menu will appear allowing you to choose form elements to use as thresholds.
- Assign a Header Label to each field. This is how the field will appear when setting up thresholds.
- Set the Position of the field (choose from 1-5 as a maximum of 5 fields can be selected per form).
Once your fields are selected and configured, they’ll display in the Threshold Fields table for reference.

Configuring the Thresholds
Step 3: Add a Threshold
Now that your fields are ready, it’s time to configure the thresholds. Click the Add button located in the top-right corner of the Threshold card. A configuration menu will appear where you can set the following:
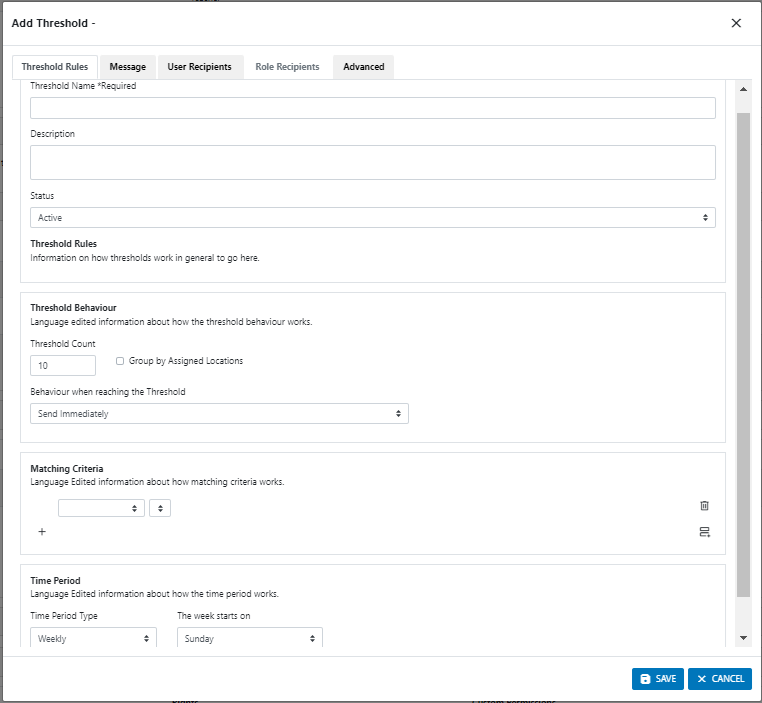
- Threshold Name: Give your threshold a clear, descriptive name.
- Description: Provide additional context or notes about the threshold.
- Status: Set the threshold to active or inactive depending on your needs. Inactive thresholds won’t trigger notifications, which can be useful for thresholds that are only relevant during specific times of the year.
Step 4: Set Threshold Behavior
This section determines when and how notifications are sent once the threshold is met. There are several behavior options to choose from:
- Send Immediately: A notification is sent as soon as the threshold is met.
- Send Immediately and Reset: A notification is sent, and the threshold counter resets, allowing the threshold to trigger again when it is met.
- Send Immediately and Increase the Threshold by X: After the initial notification is sent, the threshold is increased by a specified value, allowing you to track cumulative records over time.
- Send at the End of the Time Period: Notifications are sent at the end of a specified time period if the threshold was met during that period. The counter resets for each new period.
Step 5: Assign Role-Based Recipients
If your threshold is tied to specific locations, you can send notifications to role-based recipients. This option becomes available when the Group by Assigned Locations checkbox is selected. This ensures that the right person is notified based on their role within that location.
Defining Threshold Matching Criteria
This section is where you define what records qualify to trigger a threshold. Using the fields you set up earlier, select which values should be counted toward the threshold. You can apply multiple criteria with either AND or OR logic, giving you full flexibility in defining the rules for each threshold.
Setting the Time Period
The Time Period is important for determining the timeframe for your threshold. You can set thresholds to track weekly, monthly, or even yearly data, depending on the nature of the form. For thresholds configured to "Send at the end of the time period," the time period also determines when notifications will be sent.
Final Notes
Once everything is configured, your threshold becomes active and will start counting records that meet the criteria from that moment forward. Please note that previously entered records will not be counted retroactively, only those submitted after the threshold was activated.
Threshold Notifications offer a flexible and efficient way to stay informed of key events or trends happening within your data. By following the steps in this guide, you can set up notifications that match your exact needs and ensure you’re always notified when important thresholds are reached.
Related Articles
Best Practices for Secure Messaging: Email vs. In-App Notifications
In an ever-evolving landscape of privacy and security, ensuring the proper handling of sensitive information should be a top priority for anyone configuring notifications and communications on the platform. Each region and country has its own laws ...Configure Notifications in Form Management
Overview A notification is a configurable workflow item that is sent to one or more specified users and/or roles when it is triggered. The notifications card and the notifications editor in form management is used to configure notifications. Common ...Notification - Administrative Board
The Notification Administrative Board is a module within Clevr that you can use to review all notification activity within your organization. The Notification Administrative Board has a brand-new look and feel, and was overhauled in April of 2024. ...Configuring a Notification on a Form
Notifications are a custom type that can be added to a form, that are used to send notifications and emails to specified recipients or roles. A notification can be configured using the custom type “Email: Notifications”. Terms # Term Description 1 ...Clevr Support Plan
Overview This Support Plan outlines the activities required to maintain your Clevr implementation effectively throughout the year. It includes key support responsibilities, estimated time required for each area, training requirements, annual ...