How to Upload Bulk Images

The Bulk Image Upload page right is required to use this feature.
Bulk Image Upload provides the ability to upload Person images in bulk. To upload multiple images, the image name must match the person’s proprietary ID or local ID. Images can be uploaded as a single file or within a zip file. Supported file types are JPEG, GIF, PNG, or BMP.
Accessing Bulk Image Upload
The bulk image upload can be accessed via clicking on Configuration > Upload Multiple Person Images:
Uploading Bulk Image
Under Target you will have the option to select images for either of the following. What you select will be what is updated during the Bulk Image upload:
- Students
- Staff
The Matching Criteria field selection will allow you to specify what needs to match to update the Person Profile.
- Proprietary ID
- Local ID
The image file must include either the Student District Number (Proprietary ID) or Government Assigned Number (Local ID). If the image file name matches the proprietary ID of the clever record for example, it will be the person profile of that ID that is updated.
Adding Your File
Select Browse under Image File and choose the file that you wish to upload. You can select either one image file, to update a single profile, or a ZIP file with multiple images to update multiple person profiles.
Select the file that contains the images you would like to upload. Supported file types are JPEG, GIF, PNG, or BMP. When uploading an image file, the image name needs to match the image criteria that you are using. For example:
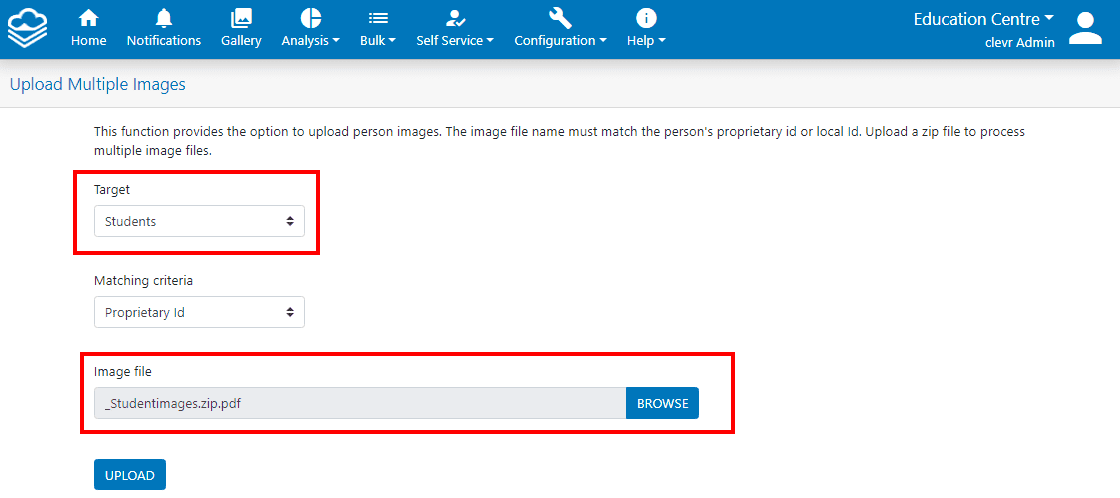
In the image below, the Target is set to Students and the Name of the file is _Studentimages.zip
Once the file successfully uploads to clevr, your results will be displayed in the Upload Multiple Images module.
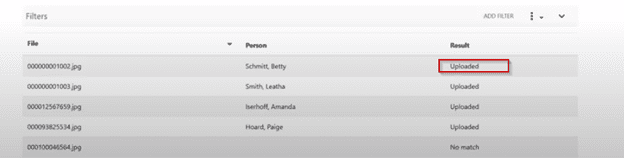
To confirm whether an image uploaded successfully, you will see “Uploaded” under the Result field and the Person Profile that the image was matched to.
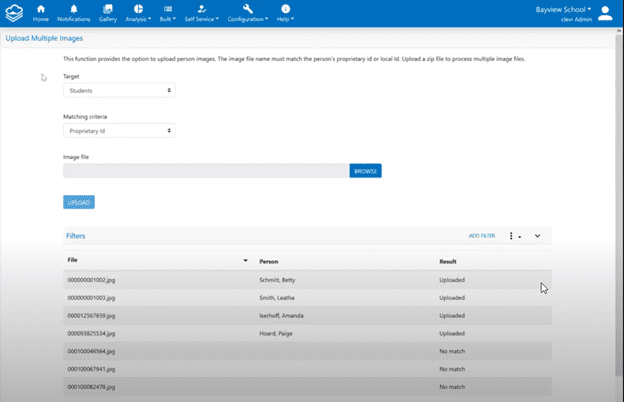
“No Match” indicates that clevr was unable to match the image file to the Person. This could be caused by the person’s profile not existing in clevr or there was nothing that matched the Person Profile in the Match Criteria. You will need to verify that the image file proprietary/local ID matches the Person Profile ID that is in clevr.
Related Articles
Bulk Data Entry
Bulk Data Entry is used to update records in bulk with the same information. How to Access Bulk Data Entry Before you navigate to the Bulk Data Entry module, select the appropriate school in the top right location dropdown. You can access the Bulk ...The New Clevr Home (AKA Dashboard)
Knowledge Articles Dashboard 2021 vs. Home 2026: Concepts & Changes A Quick Tour of Your Home Administrative Resource: Migrating to Home Administrative Resource: Strategy Guide Getting Started: Enabling Your Admin Access Documentation > Configuration ...Clevr Support Plan
Overview This Support Plan outlines the activities required to maintain your Clevr implementation effectively throughout the year. It includes key support responsibilities, estimated time required for each area, training requirements, annual ...Clevr Rollover Timing Guide
The timing of your record rollover is a key indicator of success in preparing your records for the new school year. Please refer to the 3 options below to ensure your records are prepared as expected for the new school year. Click above image to ...Security and Access Settings Guide
This guide explains each security and access setting in the system, including its purpose, where it’s found, the available options, and typical use cases. Setting: Tenant Supervisory Setting Purpose: Notifications routed to the direct supervisor. ...